What is cPanel

cPanel is a web hosting control panel software that provides a graphical user interface (GUI) and automation tools designed to simplify the process of hosting a website. It is one of the most widely used control panels in the web hosting industry.
Table of Contents
Here’s a detailed overview:
Key Features of cPanel

- User-Friendly Interface:
- Provides a straightforward and intuitive interface, making it easy for users to manage their websites, even with little technical knowledge.
- Domain Management:
- Allows users to manage multiple domains and subdomains from a single account.
- File Management:
- Users can upload, download, and manage files using the File Manager.
- Supports FTP (File Transfer Protocol) for transferring files.
- Email Management:
- Create and manage email accounts, forwarders, and autoresponders.
- Provides email filtering and spam protection.
- Database Management:
- Supports MySQL and PostgreSQL databases.
- Includes phpMyAdmin for managing databases through a web interface.
- Software and Applications:
- Allows installation of various software applications through Softaculous, such as WordPress, Joomla, and Drupal.
- Manages PHP versions and configurations.
- Security Features:
- Includes tools for SSL/TLS management.
- Provides security features such as IP blocking, SSH access, and hotlink protection.
- Backup and Restore:
- Users can create and manage backups of their websites.
- Supports full and partial backups.
- Statistics and Logs:
- Provides access to web statistics, such as bandwidth usage and visitor logs.
- Includes tools like AWStats and Webalizer for traffic analysis.
- DNS Management:
- Allows users to manage DNS records for their domains.
- Supports advanced DNS configuration.
How to Access cPanel
To access cPanel, you typically need a web hosting account that includes cPanel as part of the hosting package. Once you have the account:
- Log In: Use the URL provided by your hosting provider, often something like
http://yourdomain.com/cpanelorhttp://yourdomain.com:2083. - Credentials: Enter your username and password provided by the hosting provider.
- Navigation: Use the interface to manage your website, domains, email accounts, and other features.
Steps to Upgrade PHP Version in cPanel
Upgrading the PHP version in cPanel involves several steps, from accessing the control panel to selecting the appropriate PHP version for your domains. Here is a detailed guide on how to upgrade the PHP version in cPanel:
Step-by-Step Guide to Upgrade PHP Version in cPanel
Step 1: Log in to cPanel
- Open your web browser and navigate to your cPanel login page. This is usually something like
http://yourdomain.com/cpanelorhttp://yourdomain.com:2083. - Enter your username and password provided by your web hosting provider, then click “Log In.”
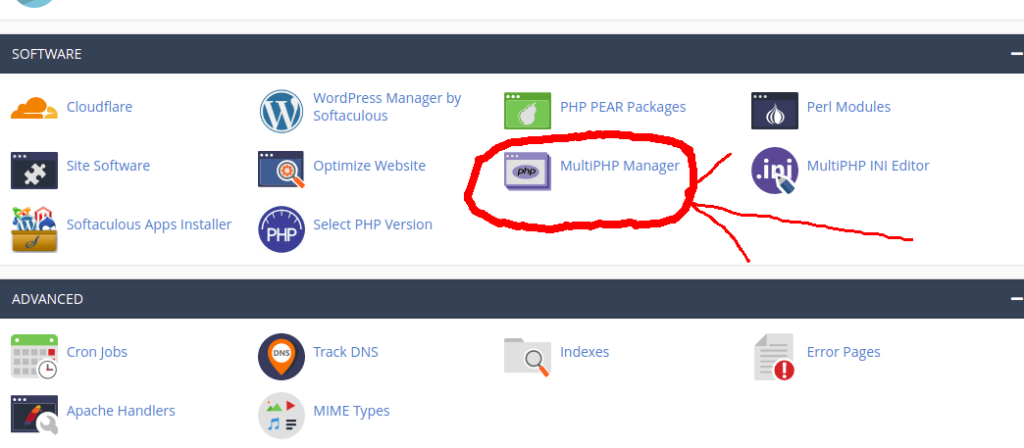
Step 2: Access the MultiPHP Manager
- Once logged in, scroll down to the “Software” section.
- Click on “MultiPHP Manager.”
Step 3: Select the Domain
- In the MultiPHP Manager interface, you will see a list of your domains.
- Select the domain(s) for which you want to upgrade the PHP version by checking the box next to each domain.
Step 4: Choose the PHP Version
- At the top of the page, you will see a dropdown menu labeled “PHP Version.”
- Click the dropdown menu and select the PHP version you want to upgrade to. Make sure to choose a version that is compatible with your website’s scripts and applications.
Step 5: Apply the Changes
- After selecting the desired PHP version, click the “Apply” button.
- cPanel will then update the PHP version for the selected domain(s). This process may take a few moments.
Step 6: Verify the Upgrade
1.To ensure the PHP version has been upgraded, you can create a PHP info file.
2.Create a new file named info.php in the root directory of your domain (usually public_html).
3.Add the following line of code to the file:

4.Save the file and access it via your web browser (e.g., http://yourdomain.com/info.php).
5.The PHP information page should display the updated PHP version.
Additional Considerations
- Compatibility: Ensure that your website’s scripts and applications are compatible with the new PHP version before upgrading. Check the documentation of your CMS, plugins, or custom code.
- Backup: It’s a good practice to backup your website files and databases before making any major changes. This ensures you can restore your site if anything goes wrong during the upgrade.
- Testing: If possible, test the upgrade in a staging environment before applying it to your live site. This helps identify and fix potential issues without affecting your live website.
By following these steps, you can successfully upgrade the PHP version for your domains in cPanel, ensuring better security, performance, and access to new features.